ඔබේ පරිගණකයට නිවැරදිම වේලාව | Get the most ‘Accurate’ Time on your PC

වෙලාව බලාගන්න අපි පාවිච්චි කරන්නෙ ඔරලෝසු. බිත්ති ඔරලෝසු, අත් ඔරලෝසු ගොඩක් ඕනෑකෙනෙක් ළඟ ඇති. තමන් ළඟ තියෙන ඔරලෝසු දෙක තුනක් අරගෙන වෙලාව බැලුවොත් පෙනේවි විවිධ ඔරලෝසු වල තියෙන්නෙ විවිධ වේලා බව. (ඒ කියන්නෙ නිවැරදිම වේලාව කොතැනකවත් නැති බව?!) එතකොට අපි කොහොමද නිවැරදිම වෙලාව ලබාගන්නෙ?
වින්ඩෝස් මෙහෙයුම් පද්ධතියෙත් ඔරලෝසුවක් තියෙනවා. (තිරයේ පහළ දකුණු කොනේ තමා ඒක තියෙන්නේ 🙂 ) මේ ඔරලෝසුව මගින් තමයි අපි දැන් නිවැරදි වේලාව ලබාගන්න හදන්නෙ. වැඩේ කරන්නේ මෙන්න මෙහෙමයි:

  • වින්ඩෝස් ඔරලෝසුව මත දෙවරක් ක්ලික් කරන්න.
  • එහි Time Zone වෙත ගොස් එහි නිවැරදි වේලා කලාපය තෝරා ඇති බව සනාථ කරගන්න. (දැන් ශ්‍රී ලංකාවේ තිබෙන්නේ GMT +06:00 නොව GMT +05:30 බව මතක තබාගන්න!)
  • දැන් Internet Time වෙත යන්න.
  • එහි Automatically Synchronize with an Internet Time Server විකල්පය සක්‍රිය කර Update Now බොත්තම ඔබන්න.
  • දැන් වින්ඩෝස් මගින් වේලා සර්වරයට සම්බන්ධ වී ඔබේ පරිගණක ඔරලෝසුවේ වේලාව තත්පරයටම නිවැරදි කරනු ඇත.
  • කාර්යය සාර්ථක නම් මෙවන් පණිවිඩයක් දකින්නට ලැබේවි: The Time has been successfully synchronized with –server– on –date/time–

බැරිවෙලාවත් මේ ලැයිස්තුවේ තිබෙන සර්වර් ක්‍රියාත්මක වෙන්නේ නැතිනම්? (මට මේ ගැටළුව ඇතිවුණා. මෙහි සාමාන්‍ය සර්වර දෙකම Timeout දෝෂ ලබාදෙනවා.) ඊටත් විසඳුමක් තියෙනවා.

  • ආරම්භක මෙනුවේ Run වෙත ගොස් Regedit යන්න ටයිප් කර Enter කරන්න.
  • එහි HKEY_LOCAL_MACHINE \ SOFTWARE \ Microsoft \ Windows \ CurrentVersion \ DateTime \ Servers වෙත යන්න.
  • Edit > New > String Value තෝරන්න.
  • එයට නිවැරදි අංකය ලබාදෙන්න. (දැනට තිබෙන්නේ සර්වර දෙකක් නම් දැන් ඇතුල් කරන්නේ තුන්වන සර්වරයයි. එසේනම් 3 ලබාදෙන්න. ඊළඟ සර්වරයට 4, 5 ආදී වශයෙන්.)
  • ඒ මත දෙවරක් ක්ලික් කර සර්වරයේ ලිපිනය ලබාදෙන්න. (වේලා සර්වර ලිපින මෙතැනින් ලබාගත හැකියි.)
  • අවසානයේ (Default) මත දෙවරක් ක්ලික් කර මුළු සර්වර ගණන ලබාදෙන්න. (උදාහරණයේ සර්වර තුනක් නිසා 3 ඇතුළත් කර ඇත.)

සර්වර පරීක්ෂා කිරීම (අවශ්‍යනම්) : ආරම්භක මෙනුවේ Run වෙත ගොස් cmd ටයිප් කර Enter කරන්න. එවිට විවෘත වන කවුළුවේ ping යන්න ටයිප් කර පරීක්ෂා කළ යුතු සර්වරයේ නම ටයිප් කරන්න. (ping time.windows.com ලෙස) එවිට Timeout errors ආදිය නොලැබේ නම් එම සර්වරය භාවිතා කළ හැකියි.

  • දැන් මුල කියූ පරිදි Internet Time වෙත ගොස් ඔබ ඇතුළත් කළ සර්වරය තෝරා Update Now බොත්තම ඔබන්න!

සියළු කටයුතු සාර්ථකයි! දැන් නිවැරදිම වේලාව රසවිඳින්න! 😀

We use Watches and Clocks to check the time, don’t we? Well everyone has at least two or more Clocks or watches hanging around. If you take those and compare them, you’ll see that the times shown on them are different. (That means the most accurate time isn’t there.) So how are we gonna get the most accurate time?
Now we know that Windows has a clock. (Don’t see it? Look, bottom right corner of your screen! 🙂 ) We are going to use this to get the accurate time. Here’s how:

  • Double click on the Windows Clock
  • Go to Time Zone and Select the right time zone.(For Sri Lanka, it’s GMT +05:30 now)
  • Go to Internet Time
  • Check the Automatically Synchronize with an Internet Time Server box and Click on Update Now
  • Now Windows will connect to a time server specified and will synchronize it with the server.
  • If it’s successful you’ll see a message like this: The Time has been successfully synchronized with –server– on –date/time–


What if the servers in this list fail? (I got time out errors with the default servers.) Here’s the solution:

  • Go to Start > Run and type regedit and click on OK
  • In the Registry Editor Navigate to HKEY_LOCAL_MACHINE \ SOFTWARE \ Microsoft \ Windows \ CurrentVersion \ DateTime \ Servers
  • Go to Edit > New > String Value
  • Give it the correct number. (If there’s only 2 servers now, the one we are going to add is 3. Next is 4, 5 etc.)
  • Double click on it give it an Server Address (Get Time Servers from here)
  • Now double click on (Default) and enter the total number of Time Servers
  • Now follow the instructions first mentioned.


That’s all! Now enjoy the most accurate time on your pc! 😀

ගූගල් මගින් මුදල් ඒකක පරිවර්තනය | Currency Conversion from Google

ගූගල් මගින් විවිධ මුදල් ඒකක පරිවර්තනය කරගැනීමේ හැකියාව පවතී. භාවිතය ඉතාමත් සරලයි. ඔබ යම් කිසි රටක මුදල් ඒකකය නොදැන සිටියත් ඒ රටේ මුදල් ඒකකයට ඕනෑම මුදල් ඒකකයක් පරිවර්තනය කරගැනීමට මෙමගින් හැකියාව ලැබේ.
භාවිතය: ගූගල් හි සෙවුම් කවුළුවේ පරිවර්තනයට අවශ්‍ය මුදල හා ඒකකය සහ ‘in’ සමග පරිවර්තනය විය යුතු මුදල් ඒකකය ඇතුල් කර සෙවීම ක්ලික් කරන්න. උදාහරණ: 1 USD in Sri Lankan Rupees – යම් රටක ඔබ නොදන්නා මුදල් ඒකකයක් නම් මෙසේ ලියන්න: 1 USD in Indian Currency 😀

Google can do currency conversions now. Usage is very simple. Even if you don’t know a currency in a specific country, you can still convert to the currency of that country too.
Usage: In the Google search box, type the amount and currency first. Then after typing ‘in’ type the currency to be converted. Example: 1 USD in Sri Lanka Rupees – If you don’t know a certain currency of a country, enter like this: 1 USD in Indian Currency – Very Simple 😀

ඇඩ්සෙන්ස් | AdSense

ඇඩ්සෙන්ස් ක්‍රියාත්මක කළත් වැඩක් නැහැ. එයින් මොනවාහරි ලැබෙයි කියලා සිතුණත්, කවුරුවත් ඒවා ක්ලික් නොකරන නිසා මොනවත් ලැබෙන්නේ කොහොමද? ඉතින් ‍කිසිම දෙයක් නොලැබෙන පලකට නැති දෙයක් තියාගෙන වැඩක් තියෙනවද? ඉතින්… ආයුබෝවන් ඇඩ්සෙන්ස්! You must’ve noticed that I activated Adsense on my blog. I thought I’ll get something from it but surprise, no one clicks on them. So what’s the point of having ads that just doesn’t bring any revenue? 🙂 Gotta remove them. So long Adsense!

සිංහල බ්ලොග් සෙවුම | Sinhala Blog Search

සිංහල බ්ලොග් වල අවශ්‍ය දේ පිළිබඳ සොයා බැලීම සඳහා සිංහල බ්ලොග් සෙවුම දැන් ක්‍රියාත්මකයි. SinhalaBlogs හි දැනට පෙන්වන බ්ලොග් සියල්ලම මෙහිත් දැනට ඇතුළත් ‍වනවා. තවත් සිංහල බ්ලොග් තිබේනම් කරුණාකර දන්වන්න.
සිංහල බ්ලොග් සෙවුම

A Search Engine for searching Sinhala Blogs is now active. All the blogs featured at SinhalaBlogs can be searched with this search engine. If you have more blogs, please contact me to add them.
Sinhala Blog Search

නැවතත්: තවත් ‘ගෙඩි පිටින්’ කොපි කිරීමක්

මා දැන් ලියන්නට සූදානම් වන්නේ විශ්වාස කිරීමට අපහසු දෙයක් ගැනයි. මෙයත් මා කලින් කියූ පරිගණක ලේඛකයාගේම වැඩක්. (පෙර ලිපිය) ළඟදී අතට ලැබුණු ඩිජිටල් කැමරා ගැන මේ ලේඛකයා ලියූ පොතක් සම්බන්ධයෙනුයි මේ ලියන්නට සූදානම් වන්නේ.

මෙවර – කොඩැක් වෙබ් අඩවිය
පොත – ඩිජිටල් කැමරා පිළිබඳ පොතකි
පොතේ මිල – රු. 300/-

කොඩැක් වෙබ් අඩවියේ භාවිත කොන්දේසි: පිටපත් අයිතිය: The Site and the Content are protected by U.S. and/or foreign copyright laws, and belong to Kodak or its partners, affiliates, contributors or third parties. The copyrights in the Content are owned by Kodak or other copyright owners who have authorized their use on the Site. You may download and reprint Content for non-commercial, non-public, personal use only (If you are browsing this Site as an employee or member of any business or organization, you may download and reprint Content only for educational or other non-commercial purposes within your business or organization, except as otherwise permitted by Kodak, for example in certain password-restricted areas of the Site and in our Frequently Asked Questions). With the exception of the Sample Images, you may not manipulate or alter in any way images or other Content on the Site.

පොතේ කොන්දේසි: මෙම පොතෙහි සියළුම හිමිකම් ඇවිරිණ. ප්‍රකාශකයන්ගේ අවසරය නිසි පරිදි ලිපියකින් නොලබා මෙහි එන කිසිවක්ම මොනම ආකාරයකින් හෝ නැවත පලකිරීම තහනම්ය … විශේෂයෙන්ම මෙහි ඇති උපදෙස් හෝ රූප සටහන් අයථා ලෙස පරිහරණය කරන අයට එරෙහිව “බුද්ධිමය දේපල නීති සංග්‍රහ පනත” යටතේ කටයුතු කරනු ඇත….

උදාහරණ: කොඩැක් පිටුව: http://www.kodak.com/eknec/PageQuerier.jhtml?pq-path=398&pq-locale=en_US&_requestid=4932

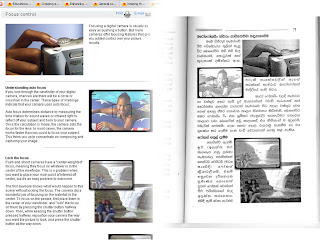
Understanding picture quality settings
Pixel is shorthand for “picture element.” It is the smallest part of a digital camera’s sensor. The word “mega” means “million.” So megapixel means the picture is made up of one million pixels, or picture elements.

The size of a digital camera’s sensor, the part that records the image, is expressed in megapixels. The greater the number of megapixels, the more information this sensor can capture and the more an image can be enlarged.

පොතේ පිටු අංක 63:
ඡායාරූපයක උසස් තත්ත්ව සැකසුම් වටහාගැනීම
පික්සෙල්ස් යනු ‘පික්චර් එලි‍මන්ට්ස්’ යන පද දෙක කෙටිකිරීමෙන් සකස් කරගත් පදයකි. එය ඩිජිටල් කැමරා සෙන්සරයේ ඇති ඉතාමත්ම කුඩා කොටසය. අංශුවය. මෙගා යනු ලක්ෂ දහයකි. එබැවින් මෙගා පික්සෙල් යන්නෙන් අදහස් කරන්නේ ඡායාරූපය පික්සෙල්ස් හෙවත් රූප අංශු ලක්ෂ දහයකින් සැදී ඇති බවය.

ඩිජිටල් කැමරාවේ සෙන්සරයේ ප්‍රමාණය හෙවත් ඉමේජය සටහන් කරගන්නා කොටස මෙගා පික්සෙල්ස් වලින් නියෝජනය වෙයි. මෙගාපික්සෙල්ස් ප්‍රමාණය ඉහළ යන විට එම සෙන්සරයට ග්‍රහණය කර ගත හැකි තොරතුරු ප්‍රමාණය මෙන්ම ඉමේජය විශාල කළ හැකි ප්‍රමාණයද ඉහල යයි.

මෙතැන සිට මුළු පිටුවම මෙසේ පරිවර්තනය කර ඇත.

තවත් පිටුවක්: http://www.kodak.com/eknec/PageQuerier.jhtml?pq-path=342/440&pq-locale=en_US

මෙම පිටුවත් සම්පූර්ණයෙන්ම යොදාගෙන තිබෙනවා. කුඩා කොටසක් දක්වන්නම්.

Keep it clean
Clean the outside of your camera by wiping it with a clean, dry cloth or soft camel’s hair brush. Never use harsh or abrasive cleaners or organic solvents on your camera or any of its parts. Avoid contact with oily substances such as suntan lotion. If your camera has a LCD (liquid crystal display), breath on it gently to create some moisture, then wipe it with a soft, lint-free cloth or untreated photographic lens tissue.

පොතේ 71 පිටුව:

පිරිසිදුව තබාගන්න
පිරිසිදු වියලි රෙදි කැබැල්ලකින් හෝ මෘදු කැමල්ස් හෙයා බුරුසුවකින් පිස දැමීම මගින් ඔබේ කැමරාවේ පිටපැත්ත පිරිසිදුව තබාගන්න. දැඩි සීරීම් ද්‍රව්‍ය හෝ රසායනික පිරිසිදු කිරීමේ ද්‍රව්‍ය මේ සඳහා කිසි විටෙක භාවිතයට නොගන්න. තෙල් සහිත ස්වභාවයක් ගන්නා ෂැම්පු වර්ග හෝ එවැනි මොනම ද්‍රව්‍යයක්වත් කැමරාවේ තැවරීමට ඉඩ නොදෙන්න. ඔබේ කැමරාවේ LCD තිරයට වැදෙන ලෙස හුස්ම ගැනීම මගින් එහි තෙතමනය ඇතිවෙයි. එවැනි දෙයක් සිදුවුවහොත් එය මෘදු, කෙඳි රහිත රෙදි කැබැල්ලකින් හෝ ඡායාරූප ශිල්පීන් සඳහාම විශේෂයෙන් සකස් කර ඇති ලෙන්ස් ක්ලීන් ටිෂු කැබැල්ලකින්, ඇඟිල්ල තද නොකර ඉතා සැහැල්ලුවෙන් පිසදා හරින්න. (එය නිවැරදිව පරිවර්තනය කර නැති බවද ඔබට පෙනෙනවා ඇති)

මේ ආකාරයට කොඩැක් වෙබ් අඩවියේ Tips & Projects Center හි තිබෙන ලිපි සියල්ලක්ම පාහේ (රූපද සමගින්) මේ පොතේ කිසිදු පැකිලීමකින් ‍තොරව අන්තර්ගත කර තිබෙනවා. කොඩැක් අඩවියේ භාවිත කොන්දේසි වල පැහැදිළිවම සඳහන් කර තිබියදීත් වාණිජ පරමාර්ථයක් උදෙසා එහි ලිපි නැවතත් ‘ගෙඩි පිටින්’ පරිවර්තනයක් කිරීමකුයි මේ සිද්ධ වී තිබෙන්නේ! 😀

ලියන්නට අපහසු තරම් විශාල උදාහරණ සංඛ්‍යාවක් නිසා උදාහරණ වැඩි ගණනක් දක්වා නැහැ. තවත් විස්තර අවශ්‍යනම් දන්වන්න.