වෙලාව බලාගන්න අපි පාවිච්චි කරන්නෙ ඔරලෝසු. බිත්ති ඔරලෝසු, අත් ඔරලෝසු ගොඩක් ඕනෑකෙනෙක් ළඟ ඇති. තමන් ළඟ තියෙන ඔරලෝසු දෙක තුනක් අරගෙන වෙලාව බැලුවොත් පෙනේවි විවිධ ඔරලෝසු වල තියෙන්නෙ විවිධ වේලා බව. (ඒ කියන්නෙ නිවැරදිම වේලාව කොතැනකවත් නැති බව?!) එතකොට අපි කොහොමද නිවැරදිම වෙලාව ලබාගන්නෙ?
වින්ඩෝස් මෙහෙයුම් පද්ධතියෙත් ඔරලෝසුවක් තියෙනවා. (තිරයේ පහළ දකුණු කොනේ තමා ඒක තියෙන්නේ 🙂 ) මේ ඔරලෝසුව මගින් තමයි අපි දැන් නිවැරදි වේලාව ලබාගන්න හදන්නෙ. වැඩේ කරන්නේ මෙන්න මෙහෙමයි:
- වින්ඩෝස් ඔරලෝසුව මත දෙවරක් ක්ලික් කරන්න.
- එහි Time Zone වෙත ගොස් එහි නිවැරදි වේලා කලාපය තෝරා ඇති බව සනාථ කරගන්න. (දැන් ශ්රී ලංකාවේ තිබෙන්නේ GMT +06:00 නොව GMT +05:30 බව මතක තබාගන්න!)
- දැන් Internet Time වෙත යන්න.
- එහි Automatically Synchronize with an Internet Time Server විකල්පය සක්රිය කර Update Now බොත්තම ඔබන්න.
- දැන් වින්ඩෝස් මගින් වේලා සර්වරයට සම්බන්ධ වී ඔබේ පරිගණක ඔරලෝසුවේ වේලාව තත්පරයටම නිවැරදි කරනු ඇත.
- කාර්යය සාර්ථක නම් මෙවන් පණිවිඩයක් දකින්නට ලැබේවි: The Time has been successfully synchronized with –server– on –date/time–
බැරිවෙලාවත් මේ ලැයිස්තුවේ තිබෙන සර්වර් ක්රියාත්මක වෙන්නේ නැතිනම්? (මට මේ ගැටළුව ඇතිවුණා. මෙහි සාමාන්ය සර්වර දෙකම Timeout දෝෂ ලබාදෙනවා.) ඊටත් විසඳුමක් තියෙනවා.
 ආරම්භක මෙනුවේ Run වෙත ගොස් Regedit යන්න ටයිප් කර Enter කරන්න.
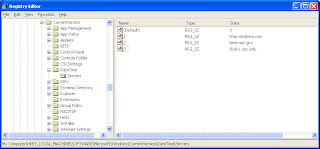
- එහි HKEY_LOCAL_MACHINE \ SOFTWARE \ Microsoft \ Windows \ CurrentVersion \ DateTime \ Servers වෙත යන්න.
- Edit > New > String Value තෝරන්න.
- එයට නිවැරදි අංකය ලබාදෙන්න. (දැනට තිබෙන්නේ සර්වර දෙකක් නම් දැන් ඇතුල් කරන්නේ තුන්වන සර්වරයයි. එසේනම් 3 ලබාදෙන්න. ඊළඟ සර්වරයට 4, 5 ආදී වශයෙන්.)
- ඒ මත දෙවරක් ක්ලික් කර සර්වරයේ ලිපිනය ලබාදෙන්න. (වේලා සර්වර ලිපින මෙතැනින් ලබාගත හැකියි.)
- අවසානයේ (Default) මත දෙවරක් ක්ලික් කර මුළු සර්වර ගණන ලබාදෙන්න. (උදාහරණයේ සර්වර තුනක් නිසා 3 ඇතුළත් කර ඇත.)
සර්වර පරීක්ෂා කිරීම (අවශ්යනම්) : ආරම්භක මෙනුවේ Run වෙත ගොස් cmd ටයිප් කර Enter කරන්න. එවිට විවෘත වන කවුළුවේ ping යන්න ටයිප් කර පරීක්ෂා කළ යුතු සර්වරයේ නම ටයිප් කරන්න. (ping time.windows.com ලෙස) එවිට Timeout errors ආදිය නොලැබේ නම් එම සර්වරය භාවිතා කළ හැකියි.
- දැන් මුල කියූ පරිදි Internet Time වෙත ගොස් ඔබ ඇතුළත් කළ සර්වරය තෝරා Update Now බොත්තම ඔබන්න!
සියළු කටයුතු සාර්ථකයි! දැන් නිවැරදිම වේලාව රසවිඳින්න! 😀
We use Watches and Clocks to check the time, don’t we? Well everyone has at least two or more Clocks or watches hanging around. If you take those and compare them, you’ll see that the times shown on them are different. (That means the most accurate time isn’t there.) So how are we gonna get the most accurate time?
Now we know that Windows has a clock. (Don’t see it? Look, bottom right corner of your screen! 🙂 ) We are going to use this to get the accurate time. Here’s how:
- Double click on the Windows Clock
- Go to Time Zone and Select the right time zone.(For Sri Lanka, it’s GMT +05:30 now)
- Go to Internet Time
- Check the Automatically Synchronize with an Internet Time Server box and Click on Update Now
- Now Windows will connect to a time server specified and will synchronize it with the server.
- If it’s successful you’ll see a message like this: The Time has been successfully synchronized with –server– on –date/time–
What if the servers in this list fail? (I got time out errors with the default servers.) Here’s the solution:
- Go to Start > Run and type regedit and click on OK
- In the Registry Editor Navigate to HKEY_LOCAL_MACHINE \ SOFTWARE \ Microsoft \ Windows \ CurrentVersion \ DateTime \ Servers
- Go to Edit > New > String Value
- Give it the correct number. (If there’s only 2 servers now, the one we are going to add is 3. Next is 4, 5 etc.)
- Double click on it give it an Server Address (Get Time Servers from here)
- Now double click on (Default) and enter the total number of Time Servers
- Now follow the instructions first mentioned.
That’s all! Now enjoy the most accurate time on your pc! 😀
 දැන්, සියළු අයිපොඩ්වල නවතම විප්ලවය හමුවෙන්නට සූදානම් වන්න. ඔව්. අයිපොඩ් ටච්. ඔබට මතක ඇති මීට කිහිප දිනකට පෙර අයිෆෝන් මගින් කළ විප්ලවය. මේ තිබෙන්නේ අයිෆෝන් එකමයි, නමුත් ‘ෆෝන්’ එක නැතුව. නව අයිපොඩ් ටච් මාදිලිය මීට පෙර පැවති සියළුම අයිපොඩ් වලට වඩා වෙනස් මගක් ගන්නක් බව පෙනෙනවා ඇති. 8GB හා 16GB මාදිලි වලින් නිකුත්වෙන මෙම නව අයිපොඩ් මාදිලියේ
  විශේෂාංග ඇත්තෙන්ම විශේෂයි. බහුස්පර්ශක අඟල් 3.5ක තිරයක් තිබෙන මෙහි වටපිටාවේ ආලෝකය අනුව තිරයේ ආලෝක මට්ටම සැකසීමේ ක්රමයක් තිබෙනවා. බහුස්පර්ශක තිරය නිසා ඔබට සියළුම කටයුතු ඇඟිලි වලින් කරන්නට පුළුවන්. (අයිෆෝන් මෙතරම් ජනප්රිය වූයේ ඒනිසා තමයි!) මෙහි ඇති ත්වරණමානය ඔබ අයිපොඩ් එක තබාගෙන සිටින්නේ කුමන අතටදැයි (සිරස් හෝ තිරස්) සොයාගෙන ඒ අනුව තිරය සකසන්නට සමත්. වෙනත් අයිපොඩ් වලට වඩා විශාල තිරය මගින් වීඩියෝ නැරඹීම විනෝදජනක කටයුත්තක් වන බව කිසිම සැකයක් නැහැ. පින්තූර 20,000 පමණ ගබඩා කරගන්නට සමත් මෙහි වෝල්පේපරයට ඔබට කැමති පින්තූරයක් යොදාගන්නටත් පුළුවන්. සෆාරි බ්රවුසරයක් හා යූටියුබ් සහය සමග, වයිෆයි අන්තර්ජාල සබඳතාවයද මෙහි තිබෙන තවත් විශේෂාංගයි. ගණන $299 සිට ඉහළටයි.
 Now, meet the revolution. Yep, the iPod Touch. If you can remember the iPhone craze, here’s the iPhone without the Phone. 😀 This model takes the iPod to a whole new level. Released in 8GB and 16GB models, this pod got some serious features. The Multitouch 3.5 inch display adjusts it’s brightness relative to the ambient light. And thanks to the Multitouch screen, you can do almost everything with your fingers. An accelerometer find how you are holding the pod (horizontal or vertical) and adjusts the display accordingly. Since the screen is larger, you can enjoy videos like never before. With ability to store 20,000 photos, you can even chose your own wallpaper to customize this baby. With a Safari Browser, Youtube support and Wi-Fi Internet Access, this rocks like never before. Priced at $299 and higher.


